You can insert a template wherever you’re working: at the cursor in the editor, from the editor’s right-click menu, or next to a node in the mind map or outline. Wherever you insert it, one Undo (Cmd+Z on macOS, Ctrl+Z on Windows and Linux) straight afterwards takes the whole template back out. Once you’ve typed in its fields, Undo first takes back your typing, then the template.
To drag a template into place instead, use the Template Library pane.
In the Editor
From the / Menu
The quickest way, once you know a template’s name or trigger:
- At the start of a line, type
/. The menu opens only when nothing but spaces comes before the/on that line. - Keep typing to narrow the list. A template is listed when what you type after
/is part of its name or its trigger. - Press
Enter, or click the template.
The template replaces the / and the text you typed after it. If the template has headings, you first choose where it goes — see Choosing Where It Goes. If you press Escape to cancel, nothing is inserted and the text you typed stays as it was.
Below the built-in Blocks, the menu lists your own templates under Templates, your team’s under Team templates, and each extension’s templates under From followed by the extension’s name. A template with a trigger shows it beside its name.
The / menu only reads letters, digits and underscores, so it closes when you type a hyphen: to find a template whose trigger is slide-image, type /slide or /image.
Templates that come with an extension have their own section, named From followed by the extension’s name. The / menu can also list extension commands — see Running Extension Commands.
From the Toolbar
Use the toolbar when you want to look through your templates first.
- Click Insert template on the editor toolbar, choose Tools > Insert Template…, or right-click in the editor and choose Insert Template…. The template picker opens with its search box ready for typing.
- Type to filter the list. The picker matches the letters you type against each template’s name, trigger and description, best matches first.
- Move through the list with the arrow keys. The preview shows the highlighted template with its headings as you wrote them and each field showing its starting value.
- Press
Enterto choose it, orEscapeto close the picker. A template with headings then asks where it should go (see below); a template without headings is inserted at the cursor straight away.
Your own templates are listed under Personal. When you have a seat in a team library, its templates follow under Team, with a line saying who last updated each one. Before you search, the team’s pinned templates are listed first. Templates from extensions follow, each under From and the extension’s name.
Insert template is greyed out in a read-only document.
Choosing Where It Goes
A template with at least one heading asks where it should go before it is inserted, so that inserting the same template several times gives sections at the same level, just as in the mind map. This step is called Where. It appears when you insert from the / menu, from the toolbar picker or Tools > Insert Template…, and from the Template Library pane with Enter, a double-click or a drop in the editor. A template with no headings is inserted at the cursor as it is, with no question.
The Where list has one row for each place the template can go, from the section you are in outwards:
- As child of “Section” — inside the section you are in, after its existing content
- After “Section” — right after the section you are in, as a sibling of it
- After “Outer section” — one row for each section that contains the one you are in, up to the top level
Each row ends with the level the template’s top heading will get, such as → H3. When that would be deeper than level 6, the row shows → • and the headings become bullet points. If the cursor is above the first heading of the document, the only choice is Top level → H1, and with a single choice there is nothing to ask: the template is inserted straight away, at the end of the text above the first heading, or at the end of the document when it has no headings.
The row that gives the same level as the one you chose last time for this template in this document is selected and marked last used, so the template keeps landing at the same level. Otherwise As child of is selected. MarkNode forgets these choices when you quit.
Below the rows, the Where it will go preview shows the nearby headings and the template’s headings at their new levels, and updates as you move the selection.
UpandDownmove the selection1to9choose a row directlyEnterinserts the template at the selected rowEscapecancels, and nothing is inserted
If the template has a form (see below), the Where rows are the top section of the form, and the fields follow underneath. Focus starts in the first field; press Shift+Tab to reach the rows, or Alt+1 to Alt+9 (Option+1 to Option+9 on macOS) to choose a row from anywhere in the form.
With text selected, the step is headed Replace selection with “Template”. The template replaces the selection, and the rows only choose its level: As child of “Section”, Sibling of “Section”, then Sibling of each section outwards.
The Where step is not asked when the position is already decided: from the right-click menu of a mind map node or outline row, when you drop a template onto the mind map or outline, and from the editor’s right-click menu on a heading line.
Filling In Fields
A template with up to three fields, none of them a choice, is filled in right in the text:
- Each field shows its default value, or today’s date for a date field, or else its name. The first field is selected.
- Type to replace it, then press
Tabto move to the next field, orShift+Tabto go back. You can also click a field to jump to it. - Fields with the same name change together as you type.
- After the last field,
Tabmoves the cursor to where the template’s author placed it, or to the end of the inserted text.
Press Escape at any point to stop moving between fields and keep the text as it is.
In Visual Editing mode, the template is inserted with each field’s starting value, without moving between fields. Click a value to change it.
A template with a choice field, a path field (see below), or more than three fields opens a small form instead, headed with the template’s name. While it is open, a bar in the editor shows where the template will go.
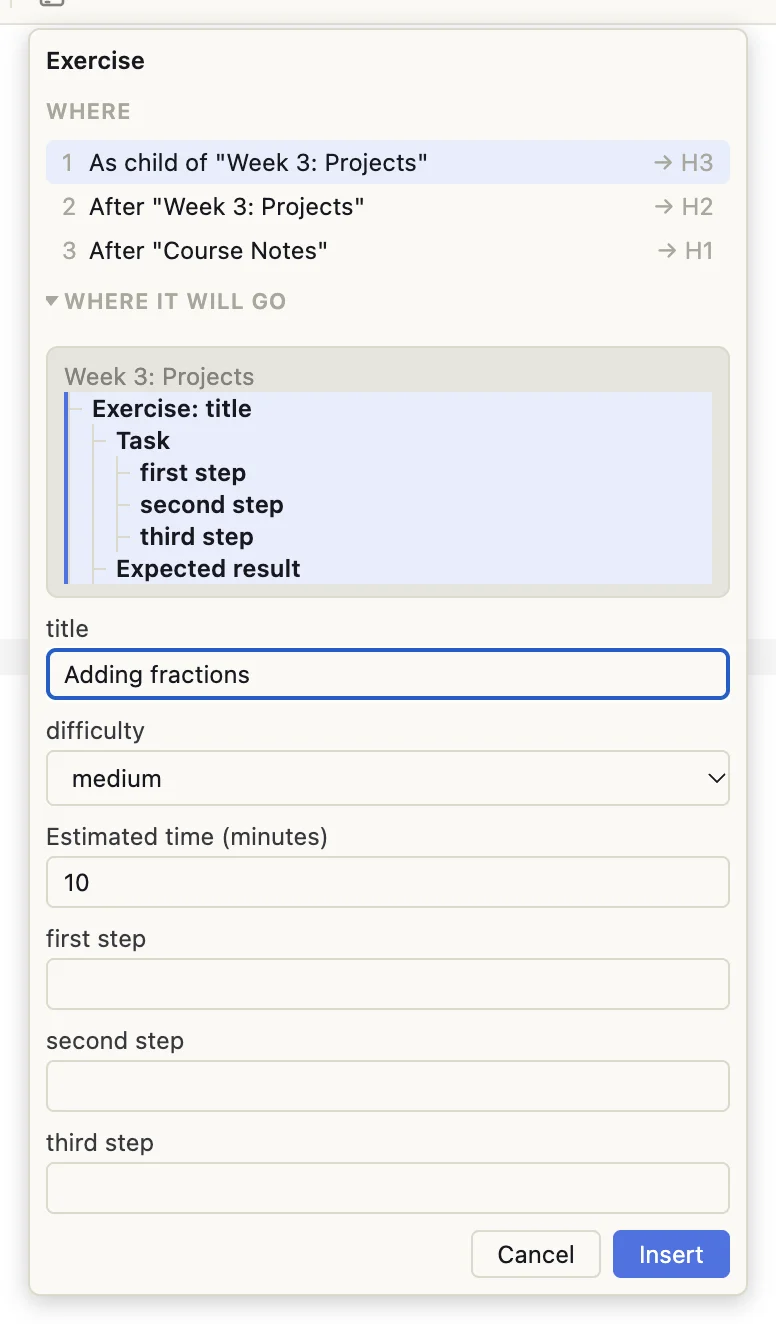
The form has one input per field, labelled with the field’s label or name:
- A text box for a text field, or a larger box for a multiline field.
- A list for a choice field, set to its default or its first choice.
- A box for a date field, holding the field’s default, or else today’s date. Type another date in the form shown in the box, such as
2026-03-14. - A box with a Browse… button for a path field — see Path Fields.
Press Enter to move to the next input; in a larger box, Enter starts a new line. To insert the template, press Cmd+Enter (Ctrl+Enter on Windows and Linux) in any input, press Enter in the last input, or click Insert. Cancel, Escape or a click outside the form closes it without inserting anything.
Path Fields
A path field holds the location of a file, such as an image or a document you link to. MarkNode treats a field as a path field when the template uses it as the destination of a link or an image ([text]({{file}}) or ), or when the template’s author has set its type to Path (see Writing Templates).
Fill in a path field in any of these ways:
- Type or paste a path. What you type is used as it is.
- Click Browse… to pick a file. The file dialog opens in the document’s folder, and for a field used only as an image it shows image files by default (Images).
- Drop a file on the box, either from the file explorer or from your computer. An empty box reminds you with Drop a file or browse (Drop an image or browse for a field used only as an image). The form stays open. If you drop several files at once, the first one is used and the box says Only one file can be used here. A field used only as an image takes only image files: drop anything else and the box keeps its value and says Only an image can be used here. Open the file’s folder in the file explorer before you insert the template: clicking outside the form closes it.
For a file inside your project, MarkNode fills in its path relative to the document, written with / on every system. A file from outside the project is copied into the document’s image folder, the same as when you drop an outside file into a document, and the path of the copy is used. If the file can’t be used, the form says so.
Using the Selection
If you select text before inserting a template, the template replaces the selection, and the selected text goes wherever the template uses {{selection}}. With no selection, the template is inserted at the cursor.
A template that starts with a heading, a list, a table or another block is moved to a line of its own when you insert it in the middle of a line.
From the Editor’s Right-Click Menu
Right-click in the editor to insert a template from its context menu. What the menu offers depends on the line you click:
- On a heading line — the same four items as for a node in the mind map: Insert Template Before…, Insert Template After…, Insert Template as Child… and Replace with Template…. They work on that heading’s section, exactly as described below, and since the position is already chosen, there is no Where step.
- On any other line — Insert Template…, which opens the template picker at that point, the same as the toolbar button.
The menu also has Save Selection as Template… — see Managing Templates. In a read-only document the insert items are greyed out, as are Cut and Paste.
In the Mind Map and Outline
Right-click a node in the mind map, or a row in the outline, to see four ways to insert a template:
- Insert Template Before… — as a new sibling just before the node
- Insert Template After… — as a new sibling just after the node, below all of its sub-sections
- Insert Template as Child… — inside the node, after its existing children
- Replace with Template… — in place of the node and everything under it
The top-level node of a document can only take a template as a child, so the other three items are greyed out for it.
Choosing the Template
Choosing one of these items opens the template picker next to the node. These menus choose the position for you, so there is no Where step. Type to filter the list by name, trigger or description, use the arrow keys to move, and press Enter to pick a template or Escape to close the picker.
The Where it will go preview shows the node’s neighbours together with the highlighted template’s headings and list items, at the level they will be inserted. For Replace with Template…, the node being replaced is shown struck through.
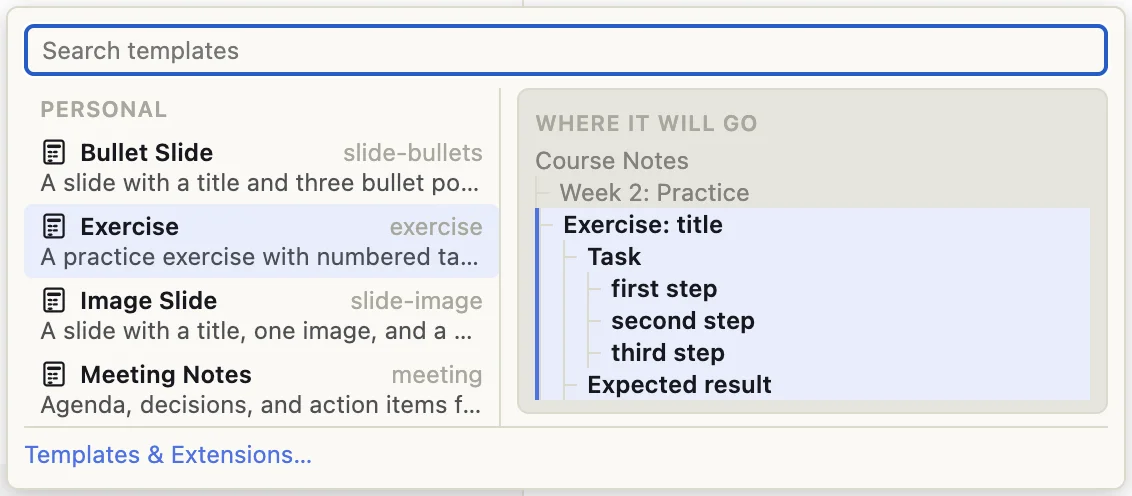
When the template has fields, the picker turns into the form described above. For Replace with Template…, the first empty text field is pre-filled with the node’s text, and {{selection}} becomes the node’s text. A template with no fields is inserted as soon as you pick it.
Where the Template Lands
The template’s headings are re-levelled to fit the node: they take the node’s level for before, after and replace, and one level deeper for as child. The mind map and outline update straight away to show the new nodes.
When the node is a list item, the template’s headings become list items at the same indent as the node, or one indent deeper for Insert Template as Child….
A template with list items but no headings behaves like this:
- Before, after or in place of a heading — its top-level list items become headings at the node’s level, so they appear as nodes in the map.
- As a child of a heading — it goes in with the heading’s own text, after any list items already there and before the first sub-heading.